The global fashion e-commerce market is on track to exceed $1 trillion by 2027. Independent clothing boutiques now have the same access to customers, tools, and technology that once required enterprise budgets. The question is no longer whether to sell clothing online — it is how to do it right from the start.
WooCommerce powers more online clothing stores than any other platform, and for good reason. It is open-source, free to install, owns zero transaction fees, and gives you complete control over your store design, product data, and customer relationships. Shopify rents you a storefront. WooCommerce hands you the deed.
This is Part 1 of a two-part guide. It covers everything you need to do before a single customer lands on your store: niche selection, business structure, your WooCommerce setup, product photography, and product page optimization. Part 2 covers plugins, SEO, marketing, conversion strategy, and the AI tools turning boutique owners into lean, high-output operations.
Step 1: Define Your Niche Before You Build Anything
The most common mistake new boutique owners make is launching a general clothing store. “Women’s clothing” is not a niche. It is a category occupied by Amazon, ASOS, and Zara — businesses with supply chains and marketing budgets you cannot compete with directly.
Your niche is the intersection of a specific customer, a specific style, and a specific gap in the market.
Profitable boutique niches in 2026 follow clear patterns:
- Values-based: Sustainable linen basics for conscious consumers
- Audience-specific: Modest fashion for professional women
- Aesthetic-driven: Dark academia streetwear for university students
- Problem-solving: Petite-fit workwear that does not need tailoring
- Community-led: Gender-neutral basics for non-binary shoppers
To validate your niche before committing, do three things:
- Check Google Trends for your primary search term over the past 24 months. You want either stable or growing search volume.
- Search Reddit, Facebook Groups, and niche forums. If your potential customers are actively discussing fit problems, return frustrations, or sourcing difficulties — those are signals of unmet demand.
- Identify your top five organic competitors. If every result is an international giant, niche down further. If the top five are small independent stores, you have room to compete.
Step 2: Write a One-Page Business Plan
You do not need a 40-page document. You need answers to six questions, documented clearly:
Who is your customer? Define them by demographics (age, income range, location), psychographics (values, lifestyle, aesthetic preferences), and pain points (sizing frustrations, lack of sustainable options, inability to visualize fit online).
What is your product range? Start with a curated capsule of 8 to 15 SKUs. Launching with 200 products before you have proven demand is a cash flow trap.
What is your business model?
- Print-on-demand: No inventory, low margins, fast to test.
- Dropshipping: No inventory, razor-thin margins, brand differentiation is very difficult.
- Private label / wholesale purchasing: Inventory required, stronger margins, full brand control. This is the standard boutique model.
- Curated vintage or deadstock resale: High margins, strong brand identity, sourcing is labor-intensive.
How will you price your products? A sustainable pricing formula: Cost of Goods + Overhead Allocation + Desired Margin = Retail Price. For clothing boutiques, 2.5x to 3.5x your landed cost (product + shipping from supplier) is a standard markup target.
What is your marketing plan? Organic SEO and email list-building are your long-term foundations. Paid social is your launch accelerant. Define a 90-day budget and a single primary channel before launch.
What does success look like in six months? Set a concrete revenue target, a conversion rate goal (industry baseline for fashion e-commerce: 1.5–2.5%), and a return rate ceiling (industry average: 25–40%; your goal should be below that).
Step 3: Handle the Legal and Financial Foundations
This step is not glamorous. It is also non-negotiable.
Register your business. The structure you choose determines your liability exposure. A sole proprietorship is the simplest setup, but it gives you zero personal asset protection. An LLC (or equivalent in your country) separates your personal finances from your business and is the standard recommendation for any boutique operating at scale.
Open a dedicated business bank account. Do not run business revenue through a personal account. Mixing finances creates accounting nightmares and complicates tax filings significantly.
Understand your tax obligations. Sales tax (or VAT, depending on your market) rules vary by jurisdiction. WooCommerce integrates with automated tax tools that calculate and apply the correct rate based on customer location. Set this up correctly at launch — retrofitting it is painful.
Register your domain name. Your domain should match or closely reflect your brand name. Secure the .com if it is available. If not, .co or a country-specific TLD is acceptable. Avoid hyphens.
Step 4: Set Up WooCommerce the Right Way
WooCommerce is a free plugin that runs on top of WordPress. The combination gives you more customization capability than any closed SaaS platform, with no transaction fees and full ownership of your data.
Choose Managed Hosting
Your hosting choice determines your store’s speed, uptime, and security. Generic shared hosting is not appropriate for an e-commerce store. Choose a managed WordPress host that offers:
- Server-level caching
- Automatic daily backups
- SSL certificate included
- PHP 8.x support
- One-click staging environment
Speed directly impacts revenue. A one-second delay in page load time reduces conversion rates by approximately 7%. For a clothing store heavily dependent on image-rich product pages, fast hosting is not optional.
Install WooCommerce and Run the Setup Wizard
From your WordPress dashboard, navigate to Plugins > Add New, search for WooCommerce, and install. The setup wizard walks you through:
- Store country and currency
- Product type (physical, digital, or both)
- Basic payment gateway configuration
- Shipping zones
Complete every step of the wizard before moving on. Skipping configuration items creates gaps you will troubleshoot later under pressure.
Choose a Theme Built for Fashion E-Commerce
Your theme controls the visual structure of your store and has a direct impact on both aesthetics and performance. Criteria for selecting a WooCommerce clothing theme in 2026:
- Built for WooCommerce: Themes developed specifically for WooCommerce handle product pages, variable products, and checkout flows correctly without requiring extensive customization.
- Mobile-first design: Over 65% of fashion e-commerce traffic is mobile. Your theme must be visually sound on a 375px wide screen before anything else.
- Lightweight codebase: Avoid themes bloated with bundled page builders or excessive JavaScript. Target a Google PageSpeed Insights mobile score above 80.
- Variable product support: Clothing stores rely on size and color variants. Your theme must display swatches cleanly.
- Lookbook and collection page support: These are standard features for boutique presentation.
Well-regarded options for fashion boutiques include Flatsome, Astra (with WooCommerce child themes), Kadence, and the native WooCommerce Storefront with a dedicated fashion child theme.
Step 5: Source Your Products and Build Your Initial Range
Your sourcing strategy depends on your business model, but regardless of model, apply these principles before placing any first order:
Always request samples before committing to bulk. Fabric weight, stitching quality, color accuracy, and sizing consistency must be verified against your brand standards before you list a product.
Start narrow. Eight to fifteen products, across two to three categories, with clear styling connections between them. A coherent capsule collection builds brand perception immediately. A sprawling, disconnected range reads as unfocused.
Think in outfits, not individual pieces. If you stock a blouse, stock the trouser that pairs with it. This mindset makes your product pages stronger and increases your average order value from launch.
Document your supplier lead times. Build lead times into your inventory planning from day one. Running out of stock on a best-selling size within the first 30 days of launch is one of the most common and avoidable early-stage revenue losses.
Step 6: Product Photography — Your Most Critical Investment
In a physical store, a customer touches the fabric, holds the garment against their body, and reads the label. On your WooCommerce store, your product photography does all of that work.
Poor photography is the single most common reason technically sound boutiques underperform. Customers cannot buy what they cannot clearly see, understand, or imagine themselves wearing.
What Traditional Product Photography Costs in 2026
A single professional fashion photoshoot — studio rental, photographer fee, model fee, styling, hair and makeup, and post-production editing — runs between £1,500 and £8,000 per day in the UK market. Depending on the number of looks, a 20-product shoot may require two full shooting days. That is a £3,000 to £16,000 investment before your store has made a single sale.
Per-image costs from professional fashion photographers in 2026 range from £75 to £450 for on-model lifestyle shots. For a boutique launching with 15 products across multiple colorways and angles, the budget requirement is significant.
This is the fundamental tension that every independent clothing boutique faces at launch: you need professional-grade imagery to compete, but professional imagery is priced for brands with established revenue.
The AI-Powered Alternative: Generate Catalog Photos Inside WordPress
This is where technology has fundamentally changed the economics of boutique ownership in 2026.
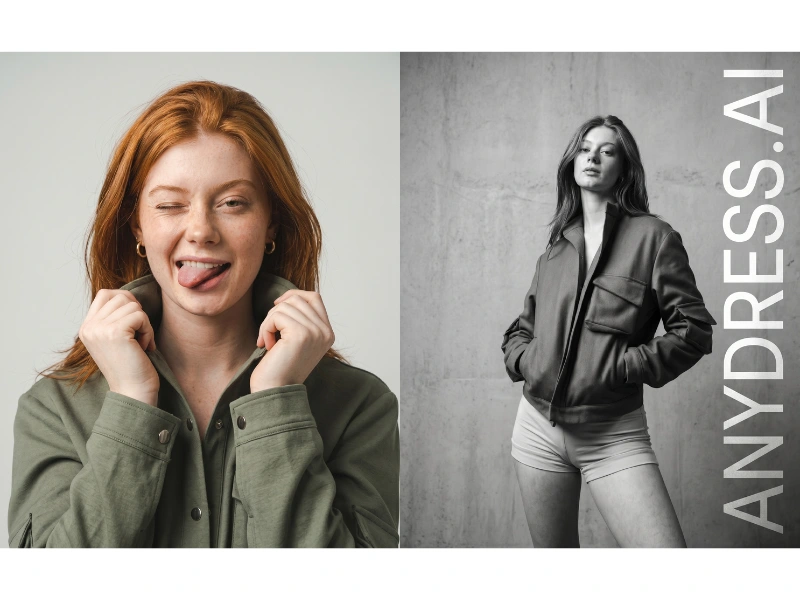
AnyDress.ai is a native WooCommerce plugin that operates directly inside your WordPress admin dashboard. Instead of booking a studio and a model, you upload your product photo and generate professional, on-model catalog imagery in seconds.
The backend photoshoot tool gives you:
- Model selection: Use existing AI models from the library, upload a specific brand ambassador’s likeness, generate randomized AI models, or use a ghost mannequin effect for a clean, editorial look.
- Background control: Change backgrounds via text prompt — “bright outdoor market,” “minimalist white studio,” “urban rooftop” — without reshooting.
- Pose options: Generate front, back, and side views of the same garment without repositioning a model.
- Photography styles: Apply editorial, street, vintage, or commercial styles in a single click.
- Direct WooCommerce sync: Save generated images directly to your WP Media Library and attach them to product galleries without leaving the dashboard. There is no exporting, no manual uploading, no switching between tools. The entire photoshoot-to-product-listing workflow happens inside WordPress.
A traditional 20-product photoshoot with model fees and studio rental costs several thousand pounds and takes weeks to schedule and complete. AnyDress generates the same catalog imagery in a fraction of the time, from inside your WP Admin, at a fraction of the cost.
For a boutique at launch — when capital allocation matters most — this is not a minor efficiency. It is a structural cost advantage.
AnyDress offers a 3-day free trial with 20 free credits, making it possible to generate your first set of professional catalog images before spending a penny. Plans start at €99/month.
Step 7: Write Product Descriptions That Convert
Product descriptions in the clothing category serve a specific function: they replace the tactile, sensory experience of in-store shopping with words. Generic descriptions fail because they list features without translating those features into what the customer actually wants to know — how it fits, how it feels, and how it will look on them.
Structure every product description around four elements:
1. The hook: One sentence that captures the garment’s character. (“A structured midi dress that moves from morning meetings to evening events without a wardrobe change.”)
2. The feel: Describe the fabric experience using sensory language. “Ribbed,” “breathable,” “weightless,” “softly structured,” “insulating without bulk.” These words create physical perception in the reader’s mind.
3. The fit: Specify how the item runs (true to size, fitted through the waist, relaxed through the hip), the model’s height and the size they are wearing, and any fit nuances (e.g., “cut generously through the shoulders for broader frames”).
4. The specs: Fabric composition, care instructions, available sizes, and any hidden features (pockets, interior tie, adjustable hem).
Optimize every product page for SEO: Include your primary keyword naturally in the product title and within the first paragraph of the long description. Write a unique meta description for every product — do not leave WooCommerce to auto-generate them.
Part 1 Summary: Your Pre-Launch Foundation
Before you open your store to customers, you should have completed:
- A validated niche with documented competitor research
- A one-page business plan with clear pricing and a 90-day marketing budget
- Your legal business structure registered and a business bank account open
- WooCommerce installed on managed hosting with your theme configured
- An initial product range of 8–15 SKUs with samples verified
- Professional product photography generated (traditional or via AnyDress.ai)
- Product descriptions written with sensory language, fit information, and SEO structure
Part 2 of this guide covers the plugins, SEO strategy, marketing channels, conversion optimization, and the frontend virtual try-on technology that reduces your return rate from day one.
Ready to generate professional catalog images without booking a studio or a model? Install AnyDress.ai and start your 3-day free trial with 20 free credits.