Every year, thousands of WooCommerce clothing stores stall at the same wall.
The products are sourced. The store is built. The payment gateway is connected. And then the founder opens a quote from a commercial photography studio and sees a number that stops everything cold — $3,500 to $15,000 for a single shoot day, with 15 to 25 usable images as the output.
For an independent clothing brand or a boutique launching its first collection, that number is not a temporary inconvenience. It is a genuine barrier to entry. And unlike the cost of hosting, a premium theme, or even paid ads, photography costs scale with every new style you add to your catalog. Add 50 SKUs per season and the problem compounds fast.
The good news: in 2026, you no longer need a photoshoot to sell clothes online professionally. The approach outlined in this guide — used by growing WooCommerce brands across Europe and North America — lets you launch and scale a clothing catalog using a combination of smart sourcing and AI-generated product imagery, with no studio, no model, and no photographer on the payroll.
Here is exactly how to do it.
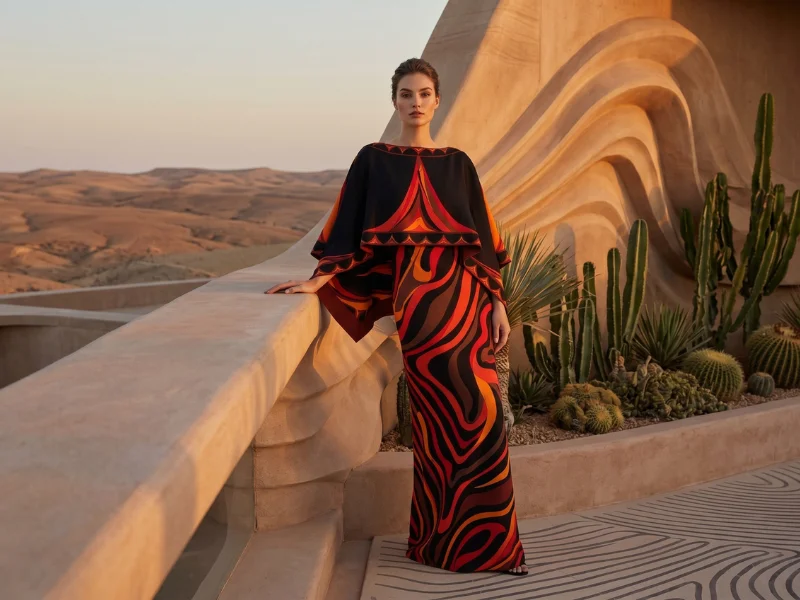
Outfit courtesy of MYTHERESA
Why Traditional Clothing Photography Blocks Most Store Launches
Before addressing the solution, it is worth being precise about the problem. The cost of a fashion photoshoot is not simply the photographer’s day rate. It is a stack of interdependent line items, each of which is non-negotiable once you are on set.
A standard shoot day for a small clothing brand includes:
- Photographer: $500–$5,000 per day, depending on experience and market
- Professional model: $500–$3,000 per day (agency models start at $1,500)
- Studio rental: $300–$2,000 per day for a white cyclorama; specialty spaces cost more
- Stylist: $500–$2,000 per day
- Hair and makeup artist: $400–$1,500 per day
- Photo retouching: $25–$150 per final image
Total for a single day: $3,500–$15,000, yielding roughly 15–40 usable images. That works out to a per-image cost of $60–$600 before hidden expenses — sample shipping, pre-production planning, post-production file management, and the near-universal contingency cost of reshoots, which industry data suggests affect 15–20% of all fashion shoots.
McKinsey’s State of Fashion report estimates that the average fashion brand spends 5–8% of annual revenue on visual content production. For a store generating $200,000 per year, that is $10,000–$16,000 directed at photography alone — every single year, for every seasonal refresh.
For a brand doing $200,000 per year, that is painful but survivable. For a brand trying to reach $200,000 per year, it is a catch-22: you cannot afford the photos that would help you sell, but you need to sell to afford the photos.
The result for most early-stage WooCommerce owners is one of three bad outcomes: launching with poor imagery and underperforming on conversions, waiting indefinitely until capital is available, or overspending on photography and underfunding everything else.
What You Actually Need to Sell Clothing Online Without a Photoshoot
The photoshoot was never the goal. The goal was always a product image that converts — one that makes a shopper trust your product enough to add it to cart.
Baymard Institute research shows that 87% of online shoppers consider product images “very important” in their purchase decision. Shopify’s own data confirms that product pages with five or more images convert 30–40% better than those with one or two. Nordstrom’s digital team found that listings with five or more high-quality images see 25% lower return rates, because buyers form more accurate expectations before purchasing.
What these figures tell you is not that you need a photoshoot. They tell you that you need images — plural, high quality, and showing the product clearly on a human body or in a context that communicates fit, drape, and proportion.
In 2026, those images can be generated without a studio, a model, or a camera. But to do that, you first need a clean source image of the garment itself.
Step 1: Get a Clean Garment Photo — Your Raw Material
Every AI-powered product image starts with a base photo of the garment. You do not need a professional camera. You do not need a studio. You need a clean, well-lit image that shows the full garment without distortion.
Here are the three practical methods WooCommerce store owners use to capture that base image:
Flat Lay Photography
The flat lay is the simplest starting point. Lay the garment on a clean white surface — a white foam board, a flat sheet, or a cleared desk — near a natural light source such as a large window. Use your smartphone. Shoot from directly above. Iron or steam the garment beforehand so there are no distracting creases.
The output does not need to be publish-ready. It needs to show the full garment, true-to-color, without shadow, without clutter. That is the only requirement for the AI processing stage to follow.
What to avoid: harsh overhead artificial lighting that creates yellow casts, patterned or colored backgrounds, visible hands or props, and extreme angles that distort the garment’s proportions.
Supplier and Manufacturer Images
If you are operating on a dropshipping or wholesale model, your supplier almost certainly has product images on file. Many suppliers — particularly those on platforms like Faire, Abound, or direct manufacturer portals — provide high-resolution garment images as part of their product listings.
These are often flat lays or ghost mannequin shots. Both work. If your supplier’s images are clear and color-accurate, they are a legitimate starting point for generating your own professional catalog images. The final AI-generated output will be distinctly yours — different model, different background, different pose — so there is no concern about visual duplication with other retailers using the same source.
Ghost Mannequin Base Shots
A ghost mannequin — also called an invisible mannequin — is a form used to give garments shape without showing a physical model. Many small photography operations offer ghost mannequin shots starting at $10–$30 per image. Some WooCommerce store owners invest in a single mannequin themselves ($80–$200 for a basic form) and shoot their entire catalog at home.
Ghost mannequin images are structurally ideal as AI input: they show the garment in three dimensions, with natural drape and volume, and they contain no face, hands, or styling to complicate the generation process.
Step 2: Understand Why On-Model Images Outperform Every Alternative
Once you have a clean garment photo, you have a choice: publish it as-is (flat lay or ghost mannequin), or convert it into an on-model professional image using AI.
The data is not ambiguous on which approach converts better.
Salsify’s 2025 consumer research found that shoppers — particularly for apparel — want to see how a garment fits a human body before purchasing. Fit, proportion, and drape on a model communicate information that a flat lay simply cannot. What does this neckline actually look like when worn? How does the hem fall? Does this oversized silhouette look intentional or shapeless?
These are the questions a shopper is asking when they view a product page. A flat lay cannot answer them. An on-model image can.
The traditional solution was to hire a model. The 2026 solution is to generate one.
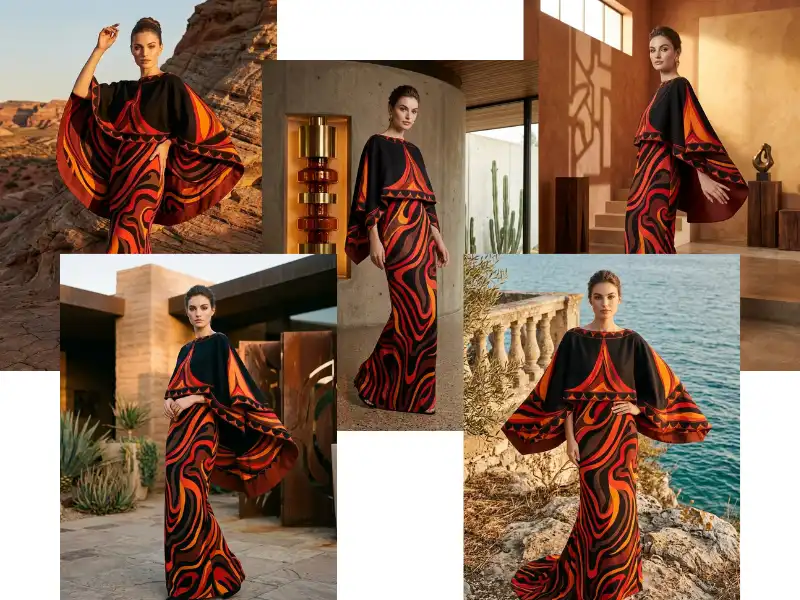
Step 3: Generate On-Model Images with AI — Inside WooCommerce
This is where the workflow fundamentally changes for WooCommerce store owners.
Most AI product photography tools operate as standalone SaaS platforms: you export your garment image, upload it to an external dashboard, generate the output, download it, and then manually re-upload it to your WooCommerce product gallery. That process is functional, but it adds a layer of friction to every single product you publish, and it puts your catalog workflow outside of WordPress entirely.
AnyDress.ai is built differently. It is a native WooCommerce plugin — meaning the entire backend AI photoshoot workflow happens directly inside your WordPress admin dashboard, with no external platform login required.
Here is how the backend photoshoot process works in practice:
- Install the AnyDress plugin from your WooCommerce admin panel
- Open any product in your catalog
- Upload your clean flat lay, ghost mannequin, or supplier image
- Select a model type: choose from existing AI models, upload your own brand model, generate a randomized AI model, or use a ghost mannequin output for model-free catalog shots
- Set a background using a text prompt (the “Magic Scene” feature) — for example, “clean white studio,” “Scandinavian interior,” or “urban street, golden hour”
- Select a pose: Front, Back, or Side
- Apply a photography style: Editorial, Street, Vintage, Studio, and others
- Generate — the plugin produces a professional, on-model product image in minutes
- Save directly to your WP Media Library and attach to the product gallery with one click
The output is catalog-ready. No download-and-re-upload loop. No manual file organization. No waiting on a photographer or retoucher to deliver finals two weeks later.
And critically: the cost per image runs at a fraction of traditional photography, with no per-day fixed costs, no minimum shoot volume, and no logistical coordination required.
Step 4: Build a Conversion-Ready Product Gallery — Image by Image
A single hero image is not enough. The data referenced earlier is clear: product pages with five or more images convert 30–40% better. Here is the image set that covers every angle a shopper needs, achievable entirely without a photoshoot:
Image 1 — Hero (Front, on-model): The primary listing image. Clean background, full body or three-quarter view, front-facing pose. This is what appears in search results and category pages. It needs to be immediate and confident.
Image 2 — Back view (on-model): Many shoppers will not purchase without seeing the back of a garment. AnyDress’s Back pose option generates this from the same session.
Image 3 — Detail shot: A close-up showing fabric texture, stitching, buttons, or a key design element. This can be captured with your smartphone macro lens before or after AI processing — no studio required.
Image 4 — Lifestyle or contextual view: A pose or background that places the garment in context — a street setting, a minimal apartment interior, an outdoor scene. AnyDress’s Magic Scene prompt handles this with a text description. No location scouting, no logistics.
Image 5 — Size or fit reference: A full-length image showing the complete silhouette, ideally with a neutral background, to help shoppers assess how the garment will look on a body proportionally similar to theirs.
Five images. All achievable from a single flat lay or ghost mannequin base photo, generated inside your WordPress admin, saved directly to your product gallery.
Step 5: Add the Frontend Layer — Let Shoppers Try Before They Buy
Building a professional catalog without a photoshoot solves the supply problem: getting products listed, looking credible, and converting at a competitive rate. But there is a second layer of the problem that the most forward-thinking WooCommerce clothing stores are now addressing — the shopper’s uncertainty about fit.
The numbers here are significant. Apparel averages a 25% return rate in e-commerce, according to 2026 industry data — the highest of any product category. The leading cause is fit uncertainty: research from Claimlane and BoldMetrics consistently attributes 44–53% of all clothing returns to size and fit issues. Each return costs the store owner $10–$65 to process in reverse logistics, inspection, and restocking, with only 48% of returned items resold at full price.
The downstream consequence is not just operational. It is financial. A $10M apparel brand running a 25% return rate and a $20-per-return processing cost is absorbing $500,000 annually in return costs alone — before write-offs on items that come back unsellable.
Virtual try-on technology directly addresses the root cause. Industry data shows that stores implementing virtual try-on reduce return rates by 20–30% and see conversion rate increases of up to 200% on equipped product pages. The mechanism is straightforward: when a shopper can see themselves wearing a garment before purchasing, they make a more informed decision. The expectation gap — the single largest driver of apparel returns — closes.
AnyDress.ai’s frontend virtual try-on adds this capability to your WooCommerce store with a single plugin install. Shoppers see a customizable “Try It On” button alongside your “Add to Cart” button on every product page. They upload a photo — face only, or full body — and see themselves wearing the garment in seconds. The experience is frictionless, requires no app download, and works on any device.
From a store management perspective, the tool includes a built-in Daily Try-On Limit setting — a budget protection control that lets you cap how many AI generations occur per day, so API costs scale in line with your store’s traffic rather than running uncapped.
The result is a WooCommerce store that not only looks like a professional catalog — because the product imagery was generated at that standard — but also behaves like an enterprise-grade retail experience at the point of purchase.
Step 6: The Launch Sequence for a No-Photoshoot WooCommerce Store
To make this practical, here is the operational sequence from zero images to a live, fully-imaged WooCommerce catalog:
Week 1 — Source your base images
Collect flat lay, ghost mannequin, or supplier images for every SKU you plan to launch. Aim for one clean, well-lit image per product. Steam or iron every garment before shooting. Use your smartphone, a white surface, and natural light. This takes roughly 10–20 minutes per product and requires no equipment purchase beyond what you already own.
Week 1–2 — Install AnyDress and begin AI generation
Install the AnyDress.ai plugin from your WooCommerce admin. Work through your catalog product by product. For each item: upload the base image, configure your model preference and photography style, set a background via the Magic Scene prompt, and generate. Review the output, and if satisfactory, save to your WP Media Library and attach to the product gallery with one click.
For a 30-SKU launch catalog, this process — once you have established a consistent visual template — runs at approximately 15–25 minutes per product including generation time and quality review.
Week 2 — Complete each product gallery
For every product, generate the full five-image set: front on-model, back on-model, detail (captured manually), lifestyle scene, and full-length silhouette. Consistency across the catalog matters. Use the same model type, the same background treatment, and the same photography style across related product categories. Visual cohesion at the catalog level signals brand professionalism and builds shopper trust before a single review has been written.
Week 2–3 — Activate frontend virtual try-on
Enable the AnyDress frontend module. Configure the Try It On button placement, the daily usage limit, and the overlay styling to match your store’s theme. Test the full shopper experience on desktop and mobile before going live.
Launch
You now have a WooCommerce clothing store with professional, on-model catalog imagery across every product — generated entirely inside your WordPress admin, without a studio, a model agency, or a photographer on retainer. The frontend virtual try-on feature is active and ready to reduce return rates from day one.
The Real Cost Comparison
Numbers anchor the decision. Here is what the two approaches actually cost for a 30-SKU launch catalog:
Traditional photoshoot route:
- Freelance photographer: $1,000–$1,500
- Freelance model: $500–$1,000
- Studio rental: $300–$600
- Basic styling and post-production: $500
- Turnaround time: 2–4 weeks from shoot to delivered finals
- Total: $2,300–$3,600 for approximately 30–60 images
- Output: one pose per product, one background, no virtual try-on, no ability to refresh seasonally without repeating the cost
AnyDress.ai route:
- 3-Day Free Trial: 20 credits at no cost
- Plugin subscription: from €299/month (Boutique Starter — 250 credits)
- Turnaround: images generated in minutes, inside WordPress, with 1-click save to product galleries
- Output: multiple poses per product, switchable backgrounds, seasonal refresh on demand, frontend virtual try-on included, no per-image fixed cost from external crew
For a 30-SKU catalog generating five images per product, that is 150 images — achievable within the Boutique Starter plan. The traditional route would require either a multi-day shoot or multiple sessions, each carrying the same fixed overhead.
More importantly: the AnyDress workflow does not stop after launch. When a new collection arrives, you generate new catalog images in the same session, in the same brand visual language, with no coordination required. When a seasonal background refresh makes commercial sense — shoot the same catalog against a winter scene, a summer terrace, a minimalist studio — you prompt it, generate it, and update the gallery. The operational freedom this creates is structural, not incidental.
Who This Approach Is Built For
Not every WooCommerce store is at the same stage. This no-photoshoot workflow delivers the strongest return in these specific situations:
Launching a new store on a constrained budget. The traditional photography requirement delays launch and consumes capital that could fund inventory, ads, or operations. Removing that bottleneck means going to market faster, with professional imagery, and with the budget intact.
Scaling a catalog faster than traditional photography allows. A growing WooCommerce store adding 10–20 new styles per month cannot sustain the coordination overhead of recurring shoots. AI generation inside the WP admin scales with the catalog without scaling the cost.
Testing new styles before committing to bulk orders. Suppliers increasingly offer sample units at low minimums. Generating professional product images from a single sample — before placing a bulk order — lets you validate commercial interest with real shoppers before committing inventory capital.
Refreshing visual content seasonally. A catalog photographed in January on a white studio background looks dated by July. AI-generated backgrounds can be updated across an entire product range in an afternoon, keeping the catalog visually current without a reshoot.
Operating as a solo founder or small team. Every hour spent coordinating a photoshoot is an hour not spent on customer acquisition, product development, or operations. The AnyDress workflow is designed to run without a dedicated creative team — from the WP Admin dashboard, by one person, at scale.
Conclusion
The photoshoot is not a prerequisite for selling clothes online. It was never a prerequisite — it was the only available method. That constraint no longer exists.
WooCommerce store owners in 2026 have access to a complete, professional catalog production workflow that runs entirely inside WordPress: from a flat lay or supplier image to a five-shot, on-model product gallery, generated in minutes, saved to the media library with one click, and paired with a frontend virtual try-on feature that converts browsers into buyers and measurably reduces returns.
The brands that move first on this advantage will enter the market faster, with lower overhead, and with visual content that matches or outperforms what their photoshoot-dependent competitors produce at ten times the cost.
If you operate a WooCommerce clothing store and you are ready to launch or scale your catalog without the bottleneck of traditional photography, AnyDress.ai offers a 3-Day Free Trial with 20 credits — enough to generate a full product gallery on your first collection and see the output for yourself before committing to a plan.